Labels

BASS (50) COMPRESSION (32) DRUMS (45) EFFECTS (49) EQUALIZATION (30) GUITAR (112) HOME RECORDING (95) IMPULSES (21) INTERVIEWS (19) KARAOKE (1) LIVE (10) MASTERING (61) MIDI (21) MIXING (179) REVIEWS (156) SAMPLES (69) SONGWRITING (19) SYNTH (3) VOCALS (31)

Monday, December 26, 2016

In - Out level matching when mixing and mastering


Hello everyone and welcome to this week's article!
Today we're going to talk about a topic related to psychoacoustics: if we eq or compress a sound making it louder, somehow, regardless if it's actually better or not, it will probably sound better to us. 

That's why people usually starts mixing at -15db, and once the sounds of all instruments are done and balanced, the peak in the mix buss is -5db: because we tweak one track to make it sound better and it ends up being louder, and then to compensate we rise the volume on the others, then we pass on the next one and make it louder, and then rise all the others... and so on... and then eventually before mastering we turn the master volume down when exporting like real cheapos.

The experienced producers can start with a chosen project level (for example -12db) and arrive at the end of the mixing phase without touching the master fader with the maximum peak still at -12db, because they did level matching when mixing, and they have kept the volumes of the single tracks at the same level of the balancing phase, thus preserving all the headroom of the project for the mastering phase.

Why not to just turn down the master fader at the end, e.g. 10db down to create headroom for the mastering phase? Because this way we will just raise the noise level 10db in our tracks, since the noise point is always there, in the same place, therefore if we sink the whole project 10db lower, it will eat up 10db of signal, the final result will sound dirtier and data will be lost for no reason.

What to do to keep the level of the tracks stable? 
Match the in-out level when mixing or mastering, both when using Equalization and Compression.
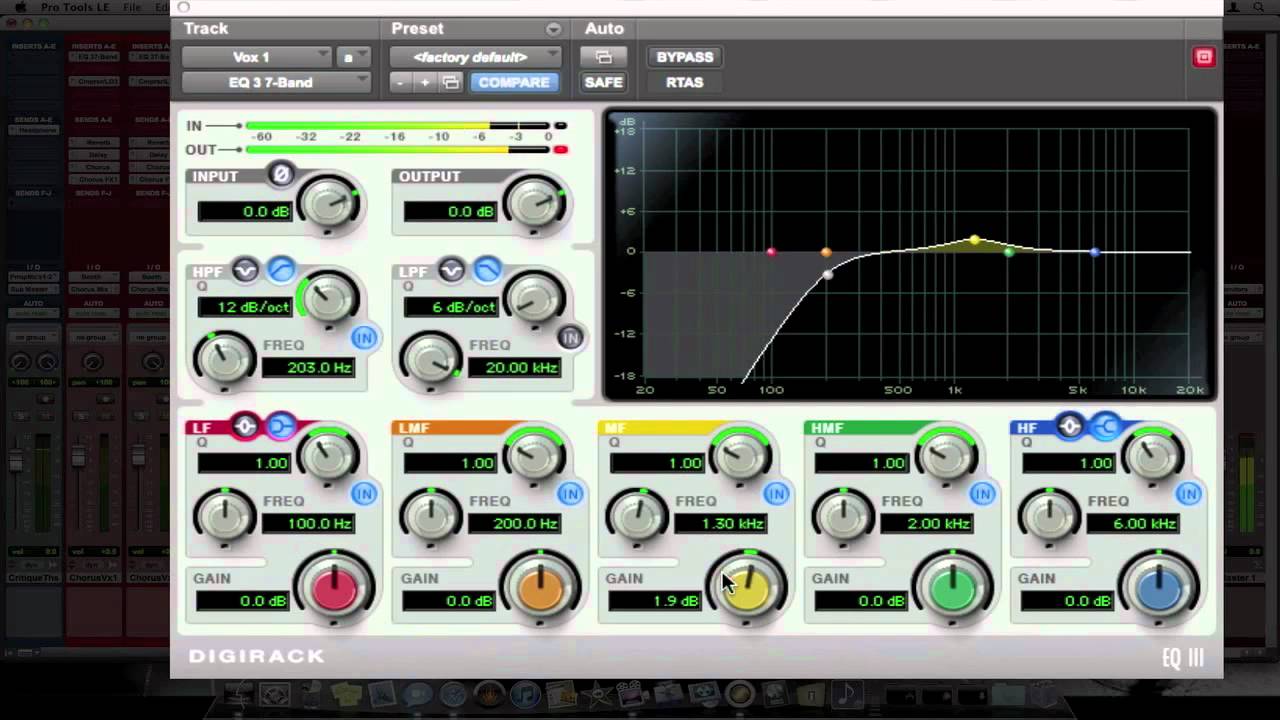
While we have seen already how to do with compression, we haven't yet talked about the equalization; on an equalizer like the Pro Tools one (as you can see from the picture on top) you can monitor the level of input and output signal, which means that for every db of boost that we apply on the sound we can lower the overall output knob of the plugin in order to match the same level of input: this way we will avoid the process of raising and raising the volume of all the tracks that I have already mentioned.
If we don't have the input and output level in the plugin ui, we must use the track metering tool: we must see how loud is the signal with the plugin bypassed and compare it to how loud it is with the eq on: if with the equalizer on the signal is louder, we should lower the output of the plugin until it matches the loudness of the bypassed one.

Once the tone balancing phase and the tone shaping phase with compressors and equalizers are done, in theory the additional processors that we can add to our mix (like modulation effects) shouldn't impact much on the level of the single tracks, therefore we should be quite safe not to raise too much the volume of our single tracks (watch out for the group tracks and the mix buss though!).


Merry Christmas and Happy new Year from Guitar Nerding Blog!


Become fan of this blog on Facebook! Share it and contact us to collaborate!!

Saturday, December 17, 2016

Review: Fabfilter Pro-C 2


Hello and welcome to this week's article!
Today we are going to talk about the new version of a plugin we already know: the Fabfilter Pro-C 2.
I have already praised Fabfilter in many occasions for being a company that has understood better than others what modern producers need: instead of proposing dozens of different compressors, equalizers and so on they just focus on creating one tool (one single compressor, one single equalizer...), abandoning any scheumorphism and offering a clean, modern interface with more features that any competitor, but also intuitive and at a good price.

Talking about interface, this new version of Pro C shows an amazing versatility: there are 3 modes, a compact one that just shows the controls of a classic compressor (and that in my case has everything I need to work comfortably), the medium one which shows several real time metering tools and a full screen one that relies also on the computational power of the gpu, so that our daw interface will be clogged only when unavoidable.

Among the other interesting new features is the side chain, that offers an equalizer to choose surgically with what frequency trigger the compression, the functions Hold and Lookahead that lets us choose when and how to apply the set gain reduction parameters, and additional metering tools compared to the first version, which makes finally this plugin also an excellent choice as a mastering compressor.

All these additions are obviously summing up to the features of the original version, making this probably the best compression plugin money can buy today.

Thumbs up!


Specs taken from the Website (only the new features):


- Eight different compression styles, of which five are new in version 2: Vocal, Mastering, Bus, Punch and Pumping (NEW)

- Side-chain EQ section, with customizable HP and LP filters, plus an additional freely adjustable filter (NEW)

- Smooth lookahead (up to 20 ms), which can be enabled/disabled to ensure zero latency processing (NEW)

- Hold (up to 500 ms) (NEW)

- Custom knee, variable from hard knee to a 72 dB soft knee (to enable saturation-like effects) (NEW)

- Up to 4x oversampling (NEW)

- Audition Triggering option, which enables users to hear on which parts of the audio Pro-C 2 is triggering and how much compression is taking place (NEW)

- Multiple interface sizes: Small, Medium and Large (NEW)

- Range setting, which limits the maximum applied gain change (NEW)
- Mix setting, which scales the gain change from 0% to 200% (NEW)
- Accurate, large level and gain change meters, with peak and loudness level visualization. The loudness level complies with the Momentary mode of the EBU R128 / ITU-R 1770 standards (NEW)

- Optional MIDI triggering (NEW)


Become fan of this blog on Facebook! Share it and contact us to collaborate!!

Saturday, December 10, 2016

How to create guitar cab impulses from a song (free plugins and IR included!) PART 2/2


CLICK HERE TO READ PART 1/2

This happens because our impulse is too long, so what we need to do is to make it a little shorter, until it is half a second to one second (or even shorter: you will need 3 or 4 tries before get the right lenght, because it varies from impulse to impulse according to how dry we want our sound to be), and let's load an eq on its vst slot: since we are dealing with a produced and mastered song it will probably have certain frequences a little over-emphasized, so it's a very good idea to set a high pass filter starting from 50 to 100hz, and a low pass one at around 10khz. This way we will tame the excessive low end and some unwanted fizz in the high area.
An additional check that can be done is to compare the volume of our impulse response with others and see if it's clipping, if it's too high, or it's too low, and adjust it accordingly.

5) Now let's put this track in solo, export it in mono again, load it again in the cab simulator in our project and let's play again some riff with our guitar. Does our impulse still need some tweaking? If so, let's adjust lenght and/or eq again and repeat this operation until the sound is as close as possible to the original album, then save it with the name of the song and soon you will have a personal impulse library with the guitar tone your favourite songs!

Additional awesomeness: I have explained the simpliest version of how to clone a guitar tone to turn it into an impulse, but the truth is that there it would be so much more to say.
If you want to dig deeper into this world and for example fine tune furthermore the impulse you can also use an eq matching program to fine tune and copy even more the eq curve by following the procedure explained in this tutorial, this way you would combine two different cloning techniques into one.
Some producer also like to copy the overall response of a vst chain (or part of it), whether we are talking about a guitar, or a snare mixer channel, or a kick and so on, and use it in future projects to clone a certain tone print (this is also the way in which some vintage hardware modeler work), so the concept of impulse responses could be scaled in almost every aspect of our mix, but this is another story.


This sample impulse has been created based on one of my favourite guitar sounds of all times: Clenching the fists of Dissent from Machine Head.
I have tried it with TSE X50 II (but any other Peavey 5150 sim like the TSE X50 or the Nick Crow 8505 with a Tube Screamer as a booster in front should do), fiddling a bit with the eq and using the learn mode for input, and ROSEN DIGITAL PULSE as cabinet simulator.

Let me know what you think about it!

IMPULSE: MACHINE HEAD - CLENCHING THE FISTS OF DISSENT

Happy 5th birthday, Guitar Nerding Blog!


CLICK HERE TO READ PART 1/2


Become fan of this blog on Facebook! Share it and contact us to collaborate!!

Saturday, December 3, 2016

How to create guitar cab impulses from a song (free plugins and IR included!) PART 1/2


Hello everyone and welcome to this week's article!

To celebrate the first 5 years of Guitar Nerding Blog we are presenting you a juicy 2 parts tutorial!
Today we are going to learn how to create a guitar cab impulse response (or IR, click here and here for two dedicated articles on how to use them) starting from a song we love. 
The idea is to take a part of the song in which you can hear only the guitar, clone it and turn it into a convolution impulse, then load it into a cabinet simulator and use it with our favourite amp simulator, to get a result as close as possible to the original one.

Small premise: this method doesn't guarantee miracles, but in order to get really close to the sound we want to copy we should do a little research: using a the type of guitar, string gauge, tuning and pickups similar to the one the guitarist has played on that album, can make a lot of difference.

1) What we need is the free version of Voxengo Deconvolver, a standalone software produced by Voxengo that does everything we need also in the demo version, so we don't actually need the paid one.
We open it, and from the main interface press the Test Tone Gen button and save somewhere the generated wave file.

2) Now we need to open our Daw and load the song we want to copy. What we need is a song with a part in which you can hear only the guitar playing. We cut this part, even if it's just 10 seconds, and export it to 24 bit and 44khz mono, without touching the volume.

3) Let's open again Voxengo Deconvolver, load the generated test tone file in the first slot, the exported sample from your favourite song in the second one, choose the output folder and tick the 2 boxes "MP Transform" and "Normalize to -0.3 dBFS". Then let's click to Process and export our file.

4) What we have here is the raw impulse taken from our favourite song, which needs to be refined: let's create two new mono tracks: one in which we will import our impulse, and another one in which to load a guitar amp simulator that emulates some amplifier similar to the gear of the guitar player of the song, let's deactivate from it (if present) the internal cab simulator and load an external cab sim, and load our fresh impulse inside of it.
Let's try our sound: chances are that it will sound like we're playing in a cathedral, with the sound soaked in reverb.


CLICK HERE TO READ PART 2/2


Become fan of this blog on Facebook! Share it and contact us to collaborate!!

Saturday, November 26, 2016

Review: Toneforge Guilty Pleasure


Hello and welcome to this week's article!
Today we are going to review a new plugin for the Toneforge serie, Guilty Pleasure!
This is the third guitar amp plugin from Joey Sturgis' Toneforge (the first one was the Ben Bruce, the second one was the Menace, click here for the review),  and it takes the same idea behind the other two plugins (a lightweight, good sounding, complete guitar amp simulator) and applies it to a different kind of sound, more Marshall/mid rangey oriented, which is both good for '80s hard rock and for modern metal.

Let's start by saying that I like the idea behind the Toneforge guitar plugins, an idea that differentiates them by most of the other amp simulators on the market: to create a small, single amp plugin instead of a huge and expensive suite that clogs your cpu, and that eventually you'll end up using only 1%.
Better to buy just the single module you need, and load just that in your guitar channel.

The plugin is pretty complete: it features the amp, an overdrive and a noise gate, a delay, a reverb, a wah, a cabinet simulator with two cabinets (Mesa and Orange) and 4 microphones, and an Ir Loader (making it the amp modeler of the company with more features so far); plus tuner, parametric eq and limiter.

One of the smartest and most pleasant addition to this plugin is the fact that it can be loaded on a stereo buss, in which are routed for example two guitar tracks, left and right, and it will process them independently, so that two tracks are controlled by one single plugin instance (also saving cpu resources).

Another thing that I like very much about Toneforge amp modelers, and this is no exception, is that they are designed by the gold record certified producer, Joey Sturgis (click here for an interview), therefore they are made with music production in mind: the plugin sounds good even without touching the eq (this is also thanks to a serie of tweaks made by Sturgis called "Magic" that can be enabled or disabled): it has a very musical mid range that helps the guitar to cut gracefully through the mix and less grit compared to the Menace, which has a more "5150" kind of vibe.
This is something that is impossible to find in the other most popular amp modeling bundles, like Amplitube or Guitar Rig: with those you have to spend a lot of time finding the right virtual gear and tweaking it, inside the suite and with external plugins to make it sound right, while with Toneforge products, and Guilty Pleasure in particular, it just sounds good enough right after you load it, and it leaves you more time to focus on the song.

For the future, I expect also a standalone version inside the Toneforge plugins, usable also outside the Daw, so that we can just plug the jack into the interface and rock out!
I would suggest also a bass amp modeler with the same philosophy, it would rock!
For the moment I can only suggest this plugin, because it's really good, one of the best guitar amp modelers I've tried so far.

Thumbs up!


Specs taken from the website:


- High gain amp simulator with noise gate

- Two cabinet simulators (bypassable)

- Four microphones modeled

- Built in impulse loader

- Stompboxes: overdrive, delay, wah, reverb

- Rack: tuner, parametric eq, limiter

- Vst3 format with automations


Become fan of this blog on Facebook! Share it and contact us to collaborate!!

Saturday, November 19, 2016

Review: Rosen Digital Audio - Pulse


Hello and welcome to this week's article!
Today we are going to check out a new free Impulse Response loader from Rosen Digital Audio: Pulse!

Rosen Digital Audio is a studio that produces and sells Impulse responses and Kemper profiles created with their own professional equipment, in a studio environment, and the quality of their impulses is definitely high, among the best and most realistic ones offered today.
What the studio didn't have yet was a proprietary impulse loader, so they teamed up with Ignite amps (click here to read the interview),  the producers of the best Ir loader around, NadIR, and they came up with a modified version of their plugin with some additional feature and a pre-loaded Rosen Digital Ir, calling it Pulse.

Pulse therefore is very similar to Nadir and like its brother it is free, it's a very low latency plugin for real time playing, recording and mixing, it allows to load two separate impulse and to switch between them or blend them, and it has a real time sample rate conversion that is not very common in the other Impulse loaders.

The additional and unique feature of Pulse that makes me suggest it to everyone is the built in Impulse Response Pulse CAB, a very versatile Impulse response created for this plugin, that sounds pretty good in almost every genre.

The conclusion is that if you have loved NadIr you're going to love Pulse even more, since it packs the same quality and features, and an additional IR bundled, making it the best Impulse loader on the market today. And it's free!


Features taken from the website:


– Multi-platform

– A/B Control

– Real-time Sample Rate Conversion

– Compatible With All 3rd Party IR’s

– Blend Mode W/ Phase Control

– HP/LP Filters

– PULSE Cab IR Built Into The Plugin

– List View

Saturday, November 12, 2016

Tips on how to arrange a song 2/2


CLICK HERE FOR PART 1/2


Muse and White Stripes are two extremes, but they are also two manifestations of the freedom of arranging our songs any way we want; plus we must not forget that the type of arrangement of a song (especially in pop music) follows even more rules (as we have already seen for the song structure): every year more or less we can notice how radio songs follows similar arrangement, both in terms of sounds and melodies.
This is a wanted effect of psychoacoustics (the science that studies the physiological and psychological effect of sound on man): let's say that there is a pop song that has a certain success; once it is inside the head of the listener, it is much easier for the other similar songs to get catched from the casual listener, because he will feel like he already knows that song (even if it's the first time he hears it). A classic example could be Kesha's Tik Tok and Katy Perry's California Gurls, both aired in the same semester: they sound like two different arrangements of a same song.
This can sound like a casualty, but the truth is that producers want this effect to make the songs even more easy to listen.

Today? what are the tendencies in arrangement in 2016 pop music?
I have noticed a return in the use of old school samples of ethnic instruments like marimba, xylophone, pan's flute or certain ethnic percussions that were very popular in the early '90s and that today sounds quite unusual (therefore fresh), like in Sia's "the Greatest" or in Justin Bieber's "What do you Mean?". Who knows what will be the sounds of the next season?

Dynamics: another facet of arrangement is the management of dynamics inside a song.
A song can be all focused on low dynamics, almost whispered, to sound like a caress to the ears of the listener as in certain jazz songs of Diana Krall, or on the opposite the dynamics can be crushed to the max as in a brutal death metal song, in which the emotional tension is to the maximum.
There are also songs which alternate whispers to screams and loud parts to create a feeling of insecurity, like anything can happen, as in Nirvana's "Drain You".
The most natural way to play with dynamics and make a pop or a rock song euphonic is to consider the song like the waves moving in a shore: alternate moments of riptide to others in which the wave comes forward, without being extreme or unpleasant in any of these parts; the most common way to play with dynamics is usually to have a strong intro, then a verse quieter than the rest of the song, a bridge that creates a build up and a chorus that explodes, then the song implodes back in a quiet verse and starts all over (obviously nothing forbids to do exactly the opposite, what matters is the alternance that gives a sense of variety and emotional flow) and a great example is Foo Fighter's "These Days".

Additional awesomeness: an interesting example of arrangement that starts just with vocals and drums and keeps adding elements until it sounds full towards the end is Michael Jackson's "They don't care about us".

Another interesting element that we can find in some song by the king of pop but also in most of the most popular pop songs ever published is another psychoacoustic trick, which can be heard for example in the classic Black or White: some arrangement element (in this case a rattle that doubles the snare), that lasts for the lenght of the whole song and that doesn't add much to the song itself, used as a drill to get more easily into the head of the listener.
Some producer believe that this element is a typical example of sound put there to catch subconsciously the attention of the listener: it is particular, hidden and repeated for the whole song, and its job is to convoy furthermore the attention of the listener to the song without him even completely realizing the reason.

Someone consider this trick a cheap shot, other consider it fair game, but what is sure is that producers have often played with arrangements also to experiment unusual solutions, like the incredible verse of Led Zeppelin's Stairway to Heaven that can be listened also backwards resulting in a different song, or the ebm/black metal band Aborym with the song "Theta Paranoia", that uses certain synth generated waves to induce a particular state of mind.


Become fan of this blog on Facebook! Share it and contact us to collaborate!!

Saturday, November 5, 2016

Tips on how to arrange a song 1/2


Hello and welcome to this week's article!
Today, moving on with our songwriting articles, we are going to give a general overview on how pop/rock songs are arranged.

Let's start by saying that this article doesn't want by any mean to be considered complete, it is just intended to give an overview of the various schools of thought that are applied when arranging a song.
The definition of arrangement is "the art of giving an existing melody (or base) musical variety".
This means all and nothing: in our case the meaning is that once we have decided the structure of a song and the basic chords, we can lay down (arrange) the layers of instruments that will be the content of the song.
Imagine the structure of a song like in its fundamental parts as a stage: the arrangement are the dancers that dance into that stage (for example a vocal verse, a guitar solo, a piano interlude).

What is essential when arranging is the Vision. If we don't have clear the direction of our song, there is no point in writing it, because it will come out unfocused: we need to know in advance for example the mood of the song: melancholic, triumphant, happy, angry, etc, then we need to have in mind the atmosphere and the feelings we want to transpose to the listener and with what and how many sounds, finally we need to lay down a list with the instruments we will need for our song.

Jack White of the White Stripes (and other bands) had a strict rule about songwriting, he "always centered the band around the number three. Everything was vocals, guitar and drums or vocals, piano and drums", meaning that for every element he wanted to add he had to take out another one from playing at the same time, because he knows that the less elements are there, the more they sound "big" and important in the arrangement.

On the other hand we have symphonic rock bands like Muse, which (like Queen) likes to stack up on some song a huge amount of vocal harmonizations and orchestrations, and the examples could be countless if we would go furthermore into the symphonic declinations of heavy metal such as Blind Guardian and Fleshgod Apocalypse: in these cases the number of tracks in the project can be even around 500 or 1000, and unavoidably the weight of each single track on the total would be hundreds of times smaller than one of the three elements of the White Stripes song.

CLICK HERE FOR PART 2/2


Become fan of this blog on Facebook! Share it and contact us to collaborate!!

Saturday, October 29, 2016

Review: JST Transify


Hello and welcome to this week's article!
Today we are going to talk about Jst Transify, the latest version of the transient shaper plugin produced by Joey Sturgis Tones!

Transify is a tool that enables us to control the transient of our sound, and it is used usually for drums, both for single tracks or busses, to decide wether to make it pop more (if the sound is too dull) or less (if it is too snappy and without body).

The interesting thing that differentiates this plugin from the other transient shapers is the amount of controls that it offers: four bands that can be activated and tweaked independently (with the width of each one that can be controlled by a crossover pot), separate attack and sustain controls for each band, to decide in which part of the transient to intervene, a clip switch that adds some limiting and saturation, and an overall input and output control.

Like the other JST plugin, also this one uses graphics that resembles an analog device (scheumorphism), which is very pleasant to see and intuitive, and the plugin is not too demanding in terms of cpu.
I usually was not particularly fond of transient shapers exactly because often they comes with just one band (forcing you either to process the whole track or to do some uncomfortable workaround like splitting a track into 2 or more separate tracks for treating the various eq areas differently), and because they can modify the sound to a point that it doesn't sound much natural anymore.

Transify solves the problem of making the processed track sound too "digital" by adding some console saturation and analog modeling in order to hide better the cold sounding, digital recreation of the transient.

The result is more natural sounding tracks, a control very wide that lets us dial in the right amount of snap in our drum tracks without modifying the eq, and in general a better sounding song, so I really suggest everyone to give this plugin a try.


Features taken from the website:

- Four frequency band ranges available for independent transient processing

- Built-in per-band clip circuit for creating aggressive sounds and preventing peak overages

- Adjust the frequency band ranges for your material using the individual cut-off controls

- Input and Output controls for getting your signal to match levels and optimize gain staging


Become fan of this blog on Facebook! Share it and contact us to collaborate!!

Saturday, October 22, 2016

The difference between tube and solid state amps


Hello and welcome to this week's article!
Today we are going to take a look at the difference between tube watts and solid state, why does everyone say that there is a big difference?
Why does a 100w tube amp overshadows a 100w solid state one in a live environment?
I am no engineer, but we will try today to make a little clarity and to separate the facts from the myth.

Note: this article is an addition to our articles about, speakers and tubes.

Fact: 100w tube = 100w solid state.
The main difference is that a tube amp uses one or more vacuum tubes to amplify the signal while a solid state one relies only on diodes, transistors etc (for the sake of simplicity we won't talk about the many hybrids that uses a solid state power amp adding a tube just to add some harmonic warmth or those who uses digital emulation of tube response).
Then why in a live environment the tube amp usually sounds much more powerful than a solid state amp? For a serie of reasons, which involves the fact that tubes can increase certain harmonics (therefore push a little more the sound on frequences that appear to cut throught the mix better) and the break up limit.

What is the break up threshold?
When playing at a low volume with both a solid state and a tube amp we will notice that the difference between the two amps is not that noticeable, both amps have a certain amount of headroom (the space in which the volume can be increased without causing distortion), but then when we will turn up the volume we will notice that we will reach a level in which the headroom will finish and the amp will start distorting.
It's at this point that a solid state amp will start sounding really bad, therefore the volume excursion ends at the break up limit or a little over, while a tube amp can easily surpass it, since after the breakup the tubes really starts warming up adding a sligh compression and harmonic warmth that actually makes the sound even more pleasant.

What is a workaround that amp manufacturers usually choose to make solid state amps to sound comparable to tube amps? Easy: they add more watts, to let the preamp do his job with no interference.
Examples: the Marshall Mode Four head, which has 350 watt, which is used for example by the Testament guitarist Alex Skolnick, or the Fender Metalhead, which produces 400w, starting from the assumption that usually in order to match a tube amp at full volume a solid state one should usually have the triple of the wattage.

So far we have only talked about guitar amps, but with bass amps the wattages are even more extreme, because it takes even more power to deliver bass frequences with the right clarity, so the same rule applies to bass amplifiers too, and the wattages are even higher.

Myth: tube power amps sounds better than solid state power amps.
This assumption is true as long as you want/need the sound effect of tubes, which is, as we have said, a harmonic enhancement especially in the mid and high frequences and a sligh compression that influences the dynamic range. This is an effect that is often desired in rock, blues and other genres, while many jazz or funk players prefer solid state amps because they sounds usually more "clean", like the Roland Jazz Chorus, which is in production by 40 years and it is still considered an industry standard for the genre. The final word is that you should really try both solutions and find the right one for your music genre, keeping in mind that it's not mandatory to use the power amp type that everyone uses in a certain genre: heavy metal is a genre typically dominated by tube amps, but some of the most influential icons actually have shaped their tone with solid state amps (for example Dimebag Darrell of Pantera or Chuck Schuldiner of Death).

Difference between Peak and Rms wattage: some amps have the wattage calculated in rms (root mean square, which put in simple words is the average volume actually perceived by our ears), and often tube amps have their wattage reported in rms, which means that if they are 100w rms, they can play at 100w for hours, while other amps (often solid state ones) have their wattage expresses in peak: this means that if an amp is 100w peak, it can sound 100w for one fraction of a second, for example, while for most of the time it will play at around 50w rms. This is more of a marketing gimmick, and we should really be careful when reading the specifics of two amps when comparing them, or when choosing which one to buy.
This is another of the most common reasons why tube amps usually seems to sound much louder than solid state ones: the wattage is reported in a different way.

Click here for a Follow-up article about the differences between class A, B, AB and D power amps!


Become fan of this blog on Facebook! Share it and contact us to collaborate!!

Saturday, October 15, 2016

The most famous song structures in modern music


Hello and welcome to this week's article!
Today we are presenting a new blog category: songwriting!
With these articles we are going to break down some of the creation processes behind the most successful songs in terms of chords, sound choices, structures and arrangements.

Let's start by saying that by no mean these article wants to become a guideline on how you should write a song: a song is an art composition, and the main content it should convoy is INSPIRATION, not following guidelines.
If you don't have a musical or lyrical message to deliver, it's totally useless to apply the most effective structure, the most common chord progressions and the most modern sounds: music is not marketing, and the "fake" products, those created just with the cookie-cutter are easy to spot and will never remain in the heart of the listener.

Let's focus on the most common song structure: a rock or a pop song is often composed by 5 parts:

A) intro: the introduction of the song
B) verse: the part in which the bulk of the lyrics are
C) bridge: the part used as a connection between the verse and the chorus
D) chorus: the fulcrum of the song
E) instrumental: a part of the song without lyrics, e.g. a guitar solo

By listening to your favourite pop/rock/metal songs you'll notice that statistically, the most common structure is A-B-C-D-B-C-D-E-D-D, or some variation of it (for example the first verse can be longer than the second one, or there can be a bridge before the last choruses after the instrumental).
This song structure allows usually the artist to get to the first chorus within the first 90 seconds mark, which is a standard in writing songs for radio airplay, and to keep the overall song lenght under 3/3.5 minutes, which is also another standard obtained by studying the average attention span of the casual listener.

Now, we know that most of the songs follow those rules to be more effective, but there are many others that prefer other structures. Some of them for example do add or subtract some element, for example by adding another part:

F) Special: a verse that is totally different from the others

Therefore another very common song structure that we could find is the following, with all its possible variants: A-B-D-A-B-D-F-E-D-D
This structure is without the bridge, therefore the song is more agile, it takes less to get to the chorus and the variation element is the special before the instrumental part, or sometimes replacing entirely it.

Let's now do a training with a couple of famous songs, let's start with a pop one: Baby one more Time by Britney spears. In this case we can clearly see a structure A-B-C-D-A-B-C-D-A-F-D-D
which is a very common pop variant of the classic structure, in which intro + special takes entirely the place of the instrumental part to make the song even more focused and vocal-centric.

Moving towards rock/metal territories, let's check out this beautiful Iron Maiden single: Flight of Icarus, one of the most famous songs of the band. In this case the structure is A-B-C-D-A-B-C-D-E-D-E, with two guitar solos alternating with the choruses in the last part of the song, since guitar solos are (unlike in pop) a trademark in heavy metal.

As you can see the most common structure can be found in many different genres, and we encourage you to listen to your favourite songs and write down the structure, then compare them among them and with yours: it's a very interesting exercise in understanding the various dynamics inside the songs, to learn what we can do to make our songs flow more effectively, and especially to learn that in this world the rules are made to be broken and completely changed!

Additional awesomeness: there are some particular bands of less commercial genres like progressive, djent or some type of extreme metal, who deliberately change the structure from song to song making them much more complex and articulated (but often less easy listening). The structures can have different type of verses rotating (es. Verse with riff 1, verse with riff 2, verse with riff 3...), or with more than one chorus alternating. Let's try to break down the incredible Make Total Destroy by Periphery: A-B1-C-D-B2-B3-B4-E-D-E-F-B5-B1 !!!


Become fan of this blog on Facebook! Share it and contact us to collaborate!!

Saturday, October 8, 2016

5 way to achieve better separation when mixing


Hello and welcome to this week's article!
Today we are going to take a look at 5 ways to achieve a better mix separation, and this article will be particularly useful to those who feel when mixing that they can't separate exactly the various instruments, letting them mask one another and creating muddiness.

This article is connected to our "the focus of our mix", "how to use equalization" and  "ear training" articles.

1) Choose carefully what to leave in the top end area: especially in crowded mixes (those with a lot of high pitched instruments like cymbals, shakers, high vocals etc), having a high end area full of eq masking and conflicts can lead very easily to a bad mix.
We don't want our mix to be confused, so we must keep it clean by using a low pass filter on almost every instrument to free up frequency space for the chosen 2 or 3 elements that we can leave to roam in this area.
This way the selected elements of the mix will be much easier to understand and in the overall sound will result less harsh.

2) Achieving separation in the low end area: similarly to the high end area, we cannot leave each element of the mix to roam free in the lower area, therefore we will have to high pass almost every track to move them further in the mix and again avoid eq masking: we should leave in this area mainly bass and kick drum, and anyway also the kick drum doesn't need to go too much low, where the bass instead could. Definitely guitars should free up some space here.

3) The most sensitive frequences to the human ear: Top end and low end are crowded, but no area of the frequency spectrum is crowded as the most sensitive one to the human ear, the one around 2000hz. This area is the one in which we should find 2 or 3 elements that will be in the front, and lower or carve the eq of the other elements of the mix. Usually the elements of the mix that must stay in front are vocals, snare and kick, but this rule can change from genre to genre.

4) Route everything in groups/busses: creating groups of tracks is good to process them together, for example routing all the vocal tracks in one buss, all the drum skins in another one, all the rhythm guitars in a third one and so on. The purpose is yes to free up computer resources, but also to give a sense of homogeneity to all the tracks inside a group processing them together, and to separate them better: it is easier to have only 5 or 6 groups to manage with eq and compression when finding the right place to every mix part, rather than 30 single tracks.

5) Don't boost too hard: if you need any boost harder than +6db you must or reconsider your starting sound, or free up place among the other instruments in that area: when you boost a sound the computer creates a digital reconstruction of what it imagines that sound would be if it was louder in that area, but the more you boost the farthest it gets from reality and it becomes twisted and unnatural.
The ideal boosts should be 2-3db if we want to obtain a pleasant, natural sound that is representative of the source sound.


Become fan of this blog on Facebook! Share it and contact us to collaborate!!

Sunday, October 2, 2016

REVIEW: Behringer V-Amp 3


Hello and welcome to this week's article!
Today we will review a guitar amp simulator, clone of the Line6 Pod: the Behringer V-amp 3.

Someone asked me: why are you reviewing so many Behringer products?
The answer is easy: it is the less expensive company for audio equipment, therefore many amateur musicians on a tight budget often are interested in these products, plus all the units I review are products that I have personally spent some time in trying, whether they were mine or they were lent to me by some friend to write the review: basically I review what I can can get my hands on for a reasonable amount of time, and this company happens to be one of the easiest to find among the people I know.

Moving to the review, this is one of the countless guitar amp / effect simulators that have flooded the market after the digital revolution created in the early 2000 by Line 6, which has changed the paradigm about digital amplifiers bringing it to the masses, and features 32 guitar amp models, 15 speaker cabinets, a wide array of effects and can be used, like the Pod (which shares even an almost identical shape and colour), as an audio interface to record and mix straight into the pc via Usb.

Tonally this unit (which is a slight evolution from the popular V-Amp 2, clone of the legendary Pod 2.0 and which was sold also as combo version with the name V-Ampire) is really, really similar to the old Pod: the simulations are not in line with the latest (and extremely expensive) guitar amp modelers as Axe Fx, Kemper, Bias or even the recent Line6 Helix, but it can still achieve sounds surprisingly usable, especially in a live environment (in studio the most trained listeners can still find the lack of harmonic richness, which was also a problem of almost all the simulator and that only the newest ones are finding a way to overcome) or for playing at home-rehearsing, therefore under this point of view the unit passes brilliantly the test the same way the old Pod would; the downside unfortunately is the same one of all Behringer products: Build quality.

This unit falls short in terms of build quality, there is not much more to add; this is where Behringer really economizes, but this in the long run is the biggest issue with all the products of this manufacturer.
I have heard countless times about pots falling off, I have even seen on my V-ampire combo that just a sligh hit of the hull on a hard corner made most of the pots fall off, and this building problem is the same for the combo version, the rack version and the desktop version, appearently also this V-amp 3 seems to suffer the same problem.

As for other products of the same company that I have already reviewed, the final judgement comes to what is the use you intend to do with this unit: do you need it for touring, rehearsing, carrying it around? Look somewhere else, these products are too easy to break (and surprisingly expensive to fix).
Do you need it just to keep it on your desk, plug and play with the computer? At a street price of 90€ more or less (c.a. 100$), this unit can still provide some good tone and versatility, so in that case you can give it a shot.


Specs taken from the website:


- 4 all-new plus 28 improved amp models multiplied by 15 speaker cabinet simulations give you a total of 480 virtual combos

- USB audio interface included, featuring stereo I/O, optical S/PDIF out, direct monitoring and separate control for phones out

- No-latency guitar-to-PC recording—edit and monitor your sound on your V-AMP 3 and record straight to your PC

- Studio quality multi-effects including reverb, chorus, flanger, phaser, rotary, auto-wah, echo, delay, compressor and various effects combinations

- 125 memory locations pre-arranged for many popular styles and embedded in the acclaimed intuitive V-AMP user interface

- Tap-tempo function and many other parameters directly accessible on the unit

- Presence control adjusts a high-frequency filter, simulating the negative feedback of tube amps

- Preamp bypass function allows use as a stereo effects processor without amp modeling

- Stereo Aux input lets you play along to a cue from your PC, CD, MP3 or drum computer for practice, teaching and home-recording applications

- Balanced stereo Line output can be configured for many recording and live applications

- Adjustable auto-chromatic tuner plus effective global configurations and equalization easily adopts the V-AMP 3 to any situation outside your home studio

- MIDI implementation includes program changes, control changes and SysEx, allowing complete MIDI remote control or automation with your preferred DAW


Become fan of this blog on Facebook! Share it and contact us to collaborate!!

Sunday, September 25, 2016

Recording two vocal layers for thicken up the song


Hello and welcome to this week's article!
This article is related to our Vocals mixing article and our Vocals recording one. 

We are talking about a technique that is sometimes overlooked but that adds weight to a vocal track in the same way we record different layers of guitar to thicken up the "wall of sound".
We are talking of tracking two exactly identical takes of a same vocal track (sometimes of ALL vocal tracks), to give more weight and thickness to the performance.

This technique requires a singer with a perfect sense of timing, otherwise it will force the mix engineer in a huge editing work, sometimes almost impossible, with the result that he will just mute one of the two tracks.
If the performance is good and well timed the vocals will sound like they are recorded with a chorus effect, but unlike using that effect the sligh imperfections made by a real second take will make the sound much more alive and thick, and less '80s pop.
This technique of doubling the vocal track is also important to cover better some performance imperfections, since the two tracks will give the impression of masking each other's weaknesses.

This technique is used very often in r'n'b music, sometimes also in rap, and it is very effective in general in every "vocal centric" genre.
If vocals are distorted (es. growl, scream, rasp, false chords), the thickness effect is exaggerated, like doubling a very distorted guitar track: the number of voices will seem to be more than two, and it is very often used in choruses.

When doubling vocals we can both record 2 identical takes or get creative using 2 different ones (for example one sang 1 octave lower and one 1 octave higher, or one in deep growl and one in scream, or one sang from one singer and one from another - this last one requires even more skill from the 2 singers to get each take exactly at the same time one another): in this case we can get crazy with creative automations, deciding for example that during the verse we want to add a couple of db to the lower track and put the high pitch one in the background and then during the chorus we can switch them, but the usages of this tools are really infinite, and it will really add a new dimension to our songs.

Once we have started recording more takes, we may even arrive to see the classic way of recording just one vocal as dull or limiting (for certain genres, obviously if our singer is Freddie Mercury it is sufficient his own voice raw and without background music, and the album will be perfect :D ).


Become fan of this blog on Facebook! Share it and contact us to collaborate!!

Saturday, September 17, 2016

Review: Behringer HPS5000 Studio Headphones


Hello and welcome to this week's article!
Today we are going to talk about a very inexpensive model of headphones that can turn out to be handy for recording: the Behringer HPS5000.

When it comes to music production there is some people who prefer (or cannot use monitors in their bedroom studios) to work with headphones;
for this reason many producers have started offering "studio grade" headphones, with a serie of features that could make them usable also for mixing, although a realistic representation of the final sound is hard to obtain even with the most high end ones.
Among the various producers there are also some like Behringer who rely on the price as main selling point: their products are usually very economic and draws the most money attentive users.
Unfortunately as we know there are some elements in our home studio that can also not be "top tier" without affecting too much the final result, but mixing headphones are not one of those elements.

These headphones are marketed as "mixing level", but the truth is unfortunately different: the reproduction is not reliable for mixing, since they cut out most of the bass frequences and boost the medium-highs, but nevertheless they can turn out to be useful for example when recording a singer, or when sending the click to the drummer.
Construction wise they are not very solid either, with the "plastic-leather" earpieces breaking down quite fast after the purchase.

Our suggestion is to look for other producers, who provides also budget headphones without the poor building quality of these ones, for example Sennheiser.


Specs taken from the website:


Ultra-wide frequency response

High-definition bass and super-transparent highs

High-efficiency cobalt capsule

Single-sided coiled cord with oxygen-free copper wires

Optimized oval-shaped ear cups

3-Year Warranty Program*


Become fan of this blog on Facebook! Share it and contact us to collaborate!!

Saturday, September 10, 2016

Dynamic volume fader riding (creative automations)


Hello everyone and welcome to this week's article!
Today we are going to talk about a topic that is connected to our Automations article and to our "The focus of our mix" one.
We are going to talk about a practice that was very common in the past ('60s, '70s, '80s) but that with the advent of the digital domain has become less used, and that it has remained more as an arranging tool than a real technical need: riding the volume faders.

There was a time in which compressors were not as effective as today, or harware studios did not have many compressors to stack one above the other to make a track steady as a rock, therefore volume peaks, especially with songs with a high dynamic range as a vocal track with whispered parts and screamed parts, had to be manually trimmed down by raising and lowering the actual volume fader at the right moment: this practice is also known as "riding the fader".

Today as we have seen in the automations article we can still do it in real time, recording the changes, or programming it not in real time, letting all the changes to take place at the specific moment.

What is important to say it's that today this practice is an arrangement tool, and rarely a professional album can be considered completed without some volume automation to polish the final result: we need to draw the attention of the listener to the focus of that particular part, in a way that he will not even notice that we are putting something in the front or in the background.
We can also arrive to the point of bumping up one or two db a single word in a verse to give it importance, or lower the guitars in the verse to make the listener focus on the lyrics and bump them up in the chorus to give more of an explosion effect, emphasize the kick drum on a more "dance-like" part and then switch it back to normal when the part becomes back more classic... The examples are infinite, the concept to remember from this week's article is to use the volume automation to further arrange the song and make it even more understandable, more easy listening, to increase the dynamic range underlining stop and go, drops, explosions, and to make it in general more exciting, instead than relying excessively only on compressors.

Don't be shy to experiment!


Become fan of this blog on Facebook! Share it and contact us to collaborate!!

Sunday, September 4, 2016

Testing our mix on various sources


Hello everyone and welcome to this week's article!
Today we will talk about my routine when finalizing a mix.
The topic is transposition: how do our mix translates on the media that will be used by the majority of the consumers?
Will our mix made with super fancy monitors sounds the same also on some cheap laptop speaker or will it suck?
The answer is reverse engineering.

The rule of thumb is to use the best monitoring device we can, for example the best pair of monitors or the best mixing headphones, because the better they are the, the better they will translate to the other media, but this does not spare us the reverse engineering phase (although if they are good they will make it much more painless).

What do we mean by reverse engineering?
We mean having some critical listening session on a medium quality car stereo, on a private youtube video, on laptop speakers, on mobile phone headphones, and so on.
This because not only every hardware will emphasize some frequency which could potentially screw up our song, but also because software often applies some "post mastering", like some eq or some limiting, that could do even more damage (es. Youtube or iTunes), to the point that there are mastering courses today aimed just to prepare a separate mix for these specific media (which sucks).

Our aim here is, if we don't want to make a different mix for every media, to make a song with a limiting not too extremely pushed (with a ceiling of -1db to -0.2db), that can sound great from every source, so in my case I

1) listen to the song in my car taking notes of what elements of the mix pops out too much (or too little) compared to my studio monitors and I correct it (someone even connects the mixing laptop to the aux in of the car stereo and makes the corrections on the fly).

2) I do the same with cheap pc speakers

3) cheap pc headphones

4) mobile phone headphones.


Eventually I get back to the car stereo, which is my main source of music listening, and if it still sounds good after all the adjustments I upload the song on a private video on Youtube to hear if the processing affects the sound in any way.

If it still sounds good, the song is ready to be published.

Do you have a different mix checking routine? Let us know!


Become fan of this blog on Facebook! Share it and contact us to collaborate!!

Tuesday, August 30, 2016

Review: Behringer HA400 Headphone Amplifier


Hello everyone and welcome to this week's article!
Today we're going to talk about an useful tool in recording environment, the cheapest of its kind:
The Behringer HA 400 Headphone amplifier.

What is a headphone amplifier? 
Let's say that you are recording a singer and you don't have a console room separated from the recording room: you are in the same room in which the singer is performing, and you don't want the monitor sound to spill into the microphone: the only solution is to use two pair of headphones, one for the singer (or drummer, or guitar player, of any other microphoned musician) and one for the recording engineer.

This is the most classic use of this tool in a home recording environment, but the uses of this little box are various, for example even when recording a radio show or a podcast, in which there are more people talking and needing to hear the background music, commercials etc, or when recording a whole band.

This unit is basically a box that takes a headphone out from an audio interface (which usually has only one or two outs) and multiplies it in four separate stereo outs, each one with its volume knob, and it is powered by a dc adaptor that grants enough volume to make us able to hear the signal even when playing loud acoustic instruments.

Do I suggest this headphone amplifier over other, more expensive ones?
Yes, because we are not using it for the actual mixing, but only for live-tracking purposes, therefore no perfect reproduction is needed, we just need to hear the signal at a good level, therefore there is no use in investing too much money on this particular piece of gear, and maybe save some for more crucial tools like a pair of monitors.
How does it sound?
As I have said, it is not for mixing purposes: it sounds quite thin, it doesn't reproduce the full sound spectrum perfectly and probably the building quality doesn't give the impression of being particularly solid, but for static home recording purpoes does its dirty job, and as many other Behringer products it is really a good bang for the buck.


Specs taken from the website:


- Ultra-compact headphone amplifier system for studio and stage applications

- 4 independent stereo high-power amplifier sections

- Highest audio quality with virtually all types of headphones even at maximum volume

- Phones Level control per channel

- DC 12 V adapter included

- 3-Year Warranty Program


Sunday, August 21, 2016

The Focus of our Mix (a 5 points list)


Hello and welcome to this week's article!
Today we are going to talk about "the big picture", in facts often sound engineers are detail oriented nerds which focuses their attention on one detail at the time and refine it to perfection, and sometimes they can get to a point in which they lose a holistic view of the mix, for example after hours spent working on a synth sound.
The result is that when the producer hears a mix he focuses on certain things that the final listener won't even notice, and he could lose the general view of how is the song perceived.

This small list is useful to "keep the eyes on the ball", since the listener hears the complete song, not the single parts, so we will try to break down the elements that usually are more noticed in a mix, so that we will know where to put most of our efforts.
Notice that this list applies for rock, metal, punk, funk and most of pop music, but there are other genres completely different in which these rules don't apply, because they would make the song excessively rhythm based (es. jazz), so use it at your own risk.


1) Snare sound: the snare sound is the business card of the song.
It's the first thing that gets to the ear of the listener, because it is made, along with vocals, to resonate exactly in the most audible frequences for the human ear.
The snare sound alone can decide the genre of a song, imagine the typical reggae snare of the Bob Marley albums, the dry and snappy sound of the electronic dance music one, the shotgun sound of 80s rock or the acoustic vibe of '60s and '70s rock snare.
If the snare sound is botched, the WHOLE song will sound amateur, or unpleasant, even if the listener can't recognize why, so make sure to nail it.
Click here for an article about mixing drums.

2) Low end (kick and bass): this is the punch of the song, and one the core elements that makes the difference between a very amateur recording and a professional one, because to be nailed it requires expensive monitors and use of metering tools that usually amateur mix engineers doesn't consider important.
If we get right the balance both in levels and in frequences of the rhythm section, which is the whole drumset (especially the balance between snare and kick) and the bass we have done most of the mix, because the whole song will sound balanced and the listener will focus on the content, the music, which is our main objective.
Bass and kick should go as in sinergy as possible, and this assumes we have good tracks, played in time and well arranged, and the frequences should be complementary each other when mixing, so that the "house" we are building has strong foundations.

3) Vocals: Once we have a solid rhythmic section we must focus on vocals, because (unless we are mixing some swedish nineties death metal song) it will be the thing that will make the listener press play on our track.
If the vocals are bad, either because the singer is bad or because we have recorded or mixed him poorly, the song will be a failure, so we must treat it very carefully, considering that 70% of a vocal track happens during tracking; after that we can embellish it with reverb, delay, autotune, but if a vocal take sucks it cannot un-suck, so grab your best microphone, your best preamp, your best patience and record the track again if it doesn't sound perfect, because even if the song will be perfectly produced, if the vocal sucks, noone will ever want to listen to it.

4) Accompainment (guitars, piano...): now we must take care of everything is around the voice, such as guitars, or synths, or anything else, and we do it after drums and vocals, otherwise we would not be willing to sacrifice frequences or modify the perfect sound we have found to make room to drums and vocals. Keep your eyes on the ball guys!

5) Additional arrangement: This last element (such as adding small details like handclaps on snare here and there, some extra effect to underline a certain word, some lo-fi stop and go, automations etc), should be done once we have our general mix finished, and these details will be the candies we will throw to the listener to rise the attention when we are afraid he would get distracted, or to draw it towards a particular element of the song.
Use them with parsimony though, because otherwise if the song is too full of these tricks the listener will stop paying attention to them!


Become fan of this blog on Facebook! Share it and contact us to collaborate!!

Sunday, August 14, 2016

Review: Focusrite Saffire PRO 14


Hello and welcome to this week's article!
Today we are going to review an interesting audio interface, the Focusrite Saffire Pro 14.
This is a firewire interface, built in a very solid metal case and with 8 input (2 jack input with pre, 2 xlr input with pre, 2 line inputs, 1 midi in and 1 spdif in) and 6 outputs (4 line outs, 1 midi out, 1 spdif out), is one of the most common (together with its usb sister, the Scarlett serie) and used home recording audio interface in the market, due to its good quality to price ratio and rock solid reliability, both for the hardware and the drivers part.

The interface sounds well, the preamps are in line with the competitors (although I personally prefer slightly the sound of the ones in the Presonus Audiobox), the unit works at 24 bit/96 khz without problems, and the drivers are reliable (which is essential for an audio interface) and with a latency close to zero.
The unit comes with a lite version of Ableton live, and with a bundle of Focusrite Vst plugins that emulate the interface style of vintage processors, such as Equalizers and Compressors.

There are many competitors today in the market, especially in this medium price layer in which the quality is constantly rising and the prices are lowering: a firewire interface in the past was almost mandatory because Usb 1.1 interfaces were not enough reliable to manage big projects, the firewire connection was much more stable and let more data to run through without errors, but today the latest usb interfaces are as reliable as the firewire ones, without the nightmare of the hot plugging problem, which risks to destroy the pc motherboard (firewire interfaces can be plugged into the computer only with the pc turned off, otherwise it can burn the connection in the motherboard).

Is it a good idea today to buy a firewire interface

It depends on how old our pc is, if it is 5/10 years old it can often be a good idea, because firewire connection is more stable and doesn't rely on the cpu to manage the incoming and outgoing data transmission (unlike the usb connection), so it ensures a stable and soild stream of data that is essential in mixing. On the other hand, if we have a more recent pc I would suggest an usb interface, because today the pc cpu and the quality of the usb connection are good enough to mix also larger projects, and we don't have the constant risk of frying our motherboard due to accidental hot plugging.


Microphone Inputs 1-2
Frequency Response: 20Hz - 20kHz +/- 0.2 dB
Gain Range: +13dB to +60dB
Maximum Headroom +8dBu
Input Impedance: 2k Ohm

Line Inputs (Inputs 1-2)
Frequency Response: 20Hz - 20kHz +/- 0.2dB
Gain Range: -10dB to +36dB

DIGITAL PERFORMANCE
A/D Dynamic Range > 109dB (A-weighted), all analogue inputs
D/A Dynamic Range > 106dB (A-weighted), all analogue outputs
Clock Sources: - Internal Clock - Sync to Word Clock on SPDIF Input (RCA)
Supported Sample Rates: 44.1kHz, 48kHz, 88.2kHz, 96kHz

Weight and Dimensions
1.5kg / 3.3lbs
215mm (W) x 45mm (H) x 220mm (D) (8.5 x 1.8 x 8.7 inches)
Connectivity
Analogue Channel Inputs (Inputs 1-2)
2 Mic XLR Combo (channels 1-2) on front panel
2 Line 1⁄4” TRS (channels 3-4) on rear panel
Output Level control (analogue) for outputs 1 and 2
Stereo Headphones Mix 1 on 1⁄4” TRS (also routed to Outputs 3 & 4) with independent volume control
Digital Channel Outputs (Outputs 5-6) 44.1 - 96kHz
Instrument input source selection LED for channels 1 and 2
Phantom Power (48V) switch and LED for inputs 1 and 2


Become fan of this blog on Facebook! Share it and contact us to collaborate!!