Labels

BASS (50) COMPRESSION (32) DRUMS (45) EFFECTS (49) EQUALIZATION (30) GUITAR (112) HOME RECORDING (95) IMPULSES (21) INTERVIEWS (19) KARAOKE (1) LIVE (10) MASTERING (61) MIDI (21) MIXING (179) REVIEWS (156) SAMPLES (69) SONGWRITING (19) SYNTH (3) VOCALS (31)

Saturday, September 26, 2015

4 Ways to move your guitar sound towards the midrange without equalizing it


Hi everyone and welcome to this week's article!

Today we will speak about alternative ways to push our instruments, especially guitars, into their place inside of a mix without being too drastic with the eq!
The common mistake that a recording newbie does is to start with a bad sounding recorded track, and hoping to fix it in the mix with a drastic eq work, while the truth is that for example boosting strongly a midrange means recontructing digitally certain frequences, and the more we do it, the more it sounds digital and unnatural.

So, how does the pro obtain that sound? 
They surely have great microphones, great preamps, great a/d converters and so on, but most of all they nail the right sound at the source; this is a boring task, but they spend in finding the right amp settings, the right speaker to use and the right mic placement, probably more time than what they spend into shaping the guitar sound while mixing. 

1) They know by the experience how to get into the computer a sound that sounds already as much as possible "ready", and this is the first and most important method I can suggest to move a guitar sound in its place while keeping it natural and not overprocessed: to spend more time in the recording phase, trying ALL the different possibilities we have with the tool that we have, until we find a sound that we feel it can be acceptable even without processing, comparing it constantly with a reference track of our choice. 

2) The second method to emphasize the body of a guitar (but also any other instrument, like a snare or a vocal track, or cymbals) is to saturate it a bit. What do we mean a bit? Less than it becomes noticeable. Usually there is a sweet spot before it becomes too evident, in which you can add some harmonics without changing too evidently the base sound. A great saturation vst is Fabfilter Saturn.

3) A third method, which is sometimes less invasive than saturation, is harmonic excitement. A harmonic exciter add some frequency that makes the sound to pop out more, just watch out because, exactly as it happens with saturation, harmonic excitement must be added with care, avoiding it to become noticeable. A great Harmonic Exciter is the one included in the Izotope Ozone bundle.

4) A fourth and last method is to use a Console Emulation or a Channel Strip. Every piece of hardware in which we let our signal to pass through adds something and takes out something, this is obvious, and some piece of hardware is used specifically for the colour it gives to the tone.
Virtual emulators of these pieces of hardware can help us giving our tone that character that we need, without being too violent: some people just adds them in the vst slot and leaves'em there untouched, just to add their sprinkle of colour. A classic example of Console Emulation vst is Sonimus Satson, while a typical Channel Strip used to colour the sound in a nice way is Waves SSL.

Obviously these four methods will not replace completely an equalization work, but our mindset when approaching a guitar sound should be to record it as it should be perfect without any further processing, then equalizing it just to filter out the unneded-overlapping frequences (so high pass, low pass and some attenuation here and there), and finally just try to use one of these four methods in order to push the sound towards the midrange, if we feel it doesn't have a stable position in the mix yet.


Become fan of this blog on Facebook! Share it and contact us to collaborate!!

Saturday, September 19, 2015

Interview: Onqel of TSE AUDIO


Hello and welcome to this week's interview! 
This time we had a chat with John A. Johansen, a.k.a. Onqel, Ceo/Lead developer of Tse Audio, one of the most interesting guitar and bass amp simulation developer around, which offers top quality free and paid products. He is also one of the most respected users of the Ultimate Metal / Andy Sneap forum, due to his proficiency in the vst developing field.


GuitarNerdingBlog: Hi! Can you give us some detail on how Tse audio was born?

J.A.J.: TSE Audio was born back in 2009 when I decided to take a dive into amp simulations myself.
I wanted a simulation of the Engl E530 since there was no software at that time simulating that kind of amps, and eventually the X30 was born.
It started out as a hobby, and it still is exactly that :)


GNG: What do you think about the digital amp modeling business nowadays?
J.A.J.: I think the digital amp modeling business has come a far way the last 5 years or so, but there's still parts of amp simulations that are considered more or less "impossible" to do in real-time with todays techniques without simplifying the circuit in one way or another.
at the same time I also feel the market has become more or less flooded with "hype" marketing schemes/slogans that I feel doesn't really represent what they actually delivers to their customers in terms of the progress of new technology. It's a shame but it's reality, it's a tough market out there so I guess some people doesn't really care wether or not to put some extra icing on the cake just to make more people taste it.
We have a freeware software background and is a lot more humble in that area I believe. 
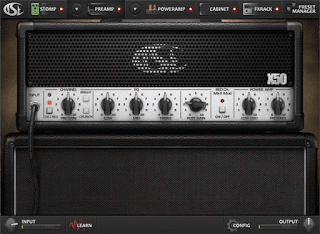
We are not afraid to let the customer make their own decisions without us throwing in a pitch how good we think it is, we have a demo version of the X50 and that's it. What you see/hear is what you get! :)


GNG: What does the design and production process of a Tse Plugin is like?

J.A.J.:The X50v2 started out as a IPlug plugin (Cockos Inc.) but as the project got bigger it just got messy and hard to work on, we recently switched to the JUCE framework to make GUI implementations etc easier and more flexible without making it too complex.
We have a fantastic small group of very dedicated beta testers that has sticked with us from the idea is created up to the product is released, even after the product has been released they are hanging around to make sure we don't miss anything when the updates are made :)
The actual modeling process depends on the complexity of the circuit we're looking at, it is mainly analysis of the target circuits and turning them into a set of equations that represents the electrical and
(discrete) dynamic response of the system. in the end the model ends up looking like a SPICE simulator optimized to process oversampled audio signal at fixed time steps.

When we feel the response of the resulting model is meeting our expectations the work is then handed over to our graphics designer.
From that point we are mainly looking for bugs to make sure there are no negative surprises when our customers takes it for a spin at home or in a live/jamming session.


GNG: What is the philosophy behind your software: analog modeling, black box approach or else?

J.A.J.: We do analog modeling wherever it is possible.
So far we haven't needed any black box approach, but if it's absolutely needed to make the job done we are open for it.
Lately I have been interested in checking out the use of Artificial Neural Networks as a MIMO (multi input multi output) approach to replace large lookup tables that can eat up the memory for even smaller circuits. The biggest downside of this approach is that ANNs needs to be "trained" beforehand to know what they should do and that is a very time-consuming process with a lot of trials and errors.


GNG: What have been your career highlights so far?

J.A.J.: My biggest highlight so far has been the release of X50 v2.4 where I finally got the chance to bring back to life the X30 model inside a environment that I had been working on what felt like forever. 
The choice of not exclusively working on freeware projects anymore was also a big decision to make that I had been postponing for a couple of years. 
I'm not excluding the possibility of maybe releasing something free in the future though :)


GNG: What do you think the future of analog and digital amps and stompboxes will look like?

J.A.J.: I think we will see a lot of new software in the next new years as new simulation strategies/technology are developed.
There are many new and original analog amps and stompboxes being made every day by small one-man companies etc and I hope people will continue to support these guys. 
Personally I think it is still cooler to see a man crank up the volume knob on his analog amp rather than seing someone sweeping his fingers over a iPad screen ;)


GNG: The interview is over! Thank you for your time and give us one last message for our readers!

J.A.J.: Thanks for the opportunity to answer your questions! 
I have a message to the readers too :)
When it comes to purchasing new digital software I would highly recommend to get hold of a couple of demo versions of interest and actually compare them against eachother before making a final decision. 
Software is rarely a cheap investment, do what you would do when going to a store to buy a new TV or deciding between a couple of guitars to buy, take a moment to compare them yourself instead of
blindly trusting the salesman, you might have a different opinion than him after a while :) YouTube reviews are also a big business where the smaller companies usually aren't represented simply because of the ridiculous high fees set by the guys doing the reviews that only a big corporation can afford to pay. I think that is unfair to both customers and small businesses and it gives a one-sided view of the (big) market which has a lot more to offer than 2-3 programs.


Monday, September 14, 2015

Review: Direct Sound Extreme Isolation EX-29 Headphones


Hello and welcome to this week's article! 
Today we will talk about headphones, and we will review a very particular type of headphones: the ones whose main purpose is to isolate the sound coming from outside.
Headphones can be used for many purposes, and most of the times they are for listening to something, but not always, or not just that.
Sometimes they are made specifically to isolate the listener from the external sounds (like the headphones used by those who use a jackhammer to not become deaf, or from those who needs to sleep frequently on a plane and wants to cut away the hum of the airplane engine).
There are basically two ways to lower the external noise with headphones: or by using an active technology (with battery powered headphones that takes the external sound with a microphone and creates for the listener an equivalent-off phase one to nullify it) or by using a passive one, which consists into applying certain construction criteria that leads to a significant decibel cut from the external sources.
Today we are taking a look at the Direct Sound Extreme Isolation Ex-29, the top shelf product of this company, which offers, by using a Passive technology, a decibel cut of 29 db.
The main purpose of these headphones is the tracking use: they are great as a monitor for the recording drummer, since there is no spill (so the click will not bleed into the overhead microphones, which is a classic drum tracking problem), and the track will be clear on the ears of the drummer, who will also be able to hear its recorded drum sound in real time.
Another typical use is when you have to to find the sweet spot while microphoning a guitar cab: although these headphones won't be able to completely eliminate the external sound, it will be lowered enough to make you focus on the signal taken from the microphone, and place it more consciously.
In conclusion these headphones do what they promise. the isolation is good enough, especially for tracking drums, and the reproducted sound is not bad at all: obviously it would be a risk to rely on it while mixing or mastering, but considering the price the sound is not bad.
If you own a recording studio, they are an essential tool!


Specs taken from the Direct Sound Website:

Type: Dynamic closed back headphones with closed back drivers
Passive Attenuation: 36.7 dB at 8,000 Hz, NRR 29 dB
Frequency Response: 20-20,000 Hz
Fidelity Response: TruSound tonally accurate
Drivers: 40 mm, closed back
Impedance: 32 Ω
Sensitivity: 114 dB at 1 KHz 1 mW
Cord: 9 ft (2,750 mm) premium twin-lead cable
Plug: Straight stereo 1/8″ (3.5 mm) gold-plated with screw-on 1/4″ (6.3 mm) gold-plated adapter
Rated Input Power: 500 mW
Maximum Input Power: 1,000 mW
IncrediFlex padded, fully adjustable headband
Foldable for storage
Convenient jack adaptor keeper
Made in the USA


Become fan of this blog on Facebook! Share it and contact us to collaborate!!

Saturday, September 5, 2015

How to make pre-productions - rough mixes super fast! (with free plugins)


Hello everyone and welcome to this week's article!
Today we will focus on how to optimize the routine as best as we can to realize rough mixes to pass to the bandmates, in order to explain them the songs or the riffs we're working on.

Let's start by saying that everyone has his own method: Kirk Hammett of Metallica just records his doodles on the Iphone and then explains them to the others in the rehearsal's room, others use Guitar Pro or Tuxguitar (the open source version), to write down the midi parts of all instruments (with the upside that it can also generate you the pdf with the tablature of those parts), while others still prefer to cure their rough mixes a little bit more, but without wasting the time necessary to make a full record, and I am one of those, because this way I feel like I can understand better wether some part will work or not in the final version.

Important: when recording real instruments, as always, set the input gain on our daw to a point that the peaks does't surpasses the -10/-12db!

First off we should create a template on our favourite Daw with a decent relative mix, so that we will lose time only the first time, and for all the songs we'll use the same template.
After loading up the Daw, we must go to "create new project" and start by creating on a Midi track our favourite virtual drum vst, for example MT POWER DRUMKIT 2, which is a very good FREE vst drum sampler; from there we can adjust the Tempo Track and write down our drum part.
If we feel like our drum sound needs a bit of extra edge, instead of working on the single sounds, just add a single band compressor on the whole drumset and fiddle with it until you find just that small sprinkle that adds some body without making it too squashed.

Now we must add 2 guitar tracks (one for the left side and one for the right one, plus a third track if we want to add a solo or some part that we specifically want to keep in the middle).
In these tracks we can load some free, lightweight vst guitar amp simulator, for example Grindmachine Free
If we want to equalize the guitar tracks a little bit we can route all of them on a group track and give them all the same Eq adjustments.

Now it's time to create a bass track, and we can just slam there a good T.s.e. Bod plugin, which simulates a Sansamp, and a compressor to keep the wave on its place.

For the vocal track, same thing: we can add all the tracks that we need and route them (if they are more than one) on the same group track and add some compression, reverb and/or delay.

Obviously we can add also other vsts, for all the synth/orchestral parts we need, or take out from our template the tracks we don't use.

Once we have tracked down all the parts, it's time to create a mix: just set the volumes to a way that each track doesn't peak above -10/12db, and use the few vsts we have loaded to stabilize the most dynamic tracks.
Then, in the master track, just add a limiter to bring the volume up to a level that is easily audible (remember that this is a pre production, though, and its purpose is to be as understandable as possible, so don't push it to the limit or make it distort, otherwise it will become even more useless than an overly pushed final master).

If everything goes according the plan, you should have obtained a very simple and stable mix, so you can save the template, and the next times you will have to record a rough mix of a song, just load this template and record over it, you will save a lot of time!


Become fan of this blog on Facebook! Share it and contact us to collaborate!!